 |
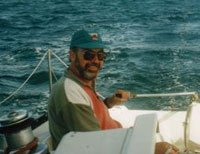
Ray Kendrick at play Older blogs: |
|
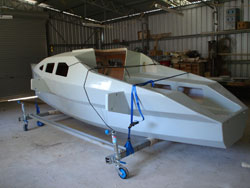
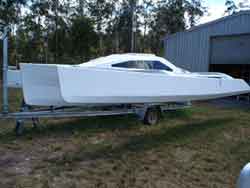
17th November 2009 Hi, One more rush of work before other projects take over again. I have built a fibreglass rudder head for the Scarab 18. The plans have a plywood one detailed and I am trying an alternative design, I may detail a simple male mould as an alternative option for builders. The main concern is to make it wide enough for the rudder blade on the inside and not too wide on the outside or propriety rudder gudgeons (specifically Ronstan RF2506). Have also made a tiller from laminated hoop pine which is in the process of being varnished and the washboards for the main hatch (also varnished). The mast post (aluminium) has been fitted and the inside painted, I used acrylic semi gloss for the insideand had it tinted the same colour as the outside (Jotun Silver Grey). I am very pleased with the result and it will look great with the cushions which are a classy blue suede looking material. The windows were fitted this week, cut from 6mm tinted acrylic sheet. I used a jigsaw with a Makita No 42 blade at a fairly slow speed for cutting the shape. The edges were sanded and a small bevel made on the outside, all holes drilled and countersunk for the screws. Fitting windows is generally a two person job as Sikaflex must be applied and that stuff can get onto things that have no connection with the windows. I always wear gloves and chuck them whenever I get Sikaflex on them.
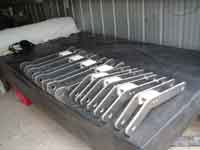
Hi, It has been a while since I have written anything for the blog, have been busy seeing to other projects. A few weeks ago I built a trolley to move boats around as Ollie, our muscle man moved away to a new house. This means that Fran and I have to do all the lifting and moving ourselves. I built it from 4 pieces of steel (2 square hollow sections and 2 round tubes the same diameter as the jockey wheel stem), 4 caravan jockey wheels and 8 jockey wheel clamps. The whole thing is completely demountable without using any tools and adjustable and works better than expected. We moved the almost finished Scarab 22 to the back of the work area and the Scarab 18 from one work area to another, overland about 50-60 metres. When the time comes to move the boat onto the trailer we will wind up the forward jockey wheels, raise the trailer tongue, and pull the boat onto the trailer. This would be overkill for a one off home builder unless he wants to be able to move the hull around the garage or shed but for us, it is a huge time and effort saving device. I have had all the aluminium arms water cut for the latest Scarab 18 and they will be installed soon. The pivot holes have all been drilled out and resin sealed and the float/beam assemblies are ready for paint. For this boat I am trying something different for the bracing tubes (at the inner ends of the beams). I am using aluminium mast sections cut to length (from a 14 foot beach cat). The ends will be filled with resin and bolted to the beams. There will be a similar section bolted at the outboard ends of the beams next to the float. The trampoline will then be threaded into the sail track of the inboard bracing tube and laced to the outboard bracing tube. This will mean that the trampolines do not flop around when the boat is folded; they will go up with the beams. There have always been a few attachment points at the fore and aft ends of the trampolines that must be disconnected for folding using snap shackles or similar, this will no longer be required.
Centreboard PivotThis article is about the centreboard pivot in some of my designs.The site of the pivot bolt can be a real pain if it starts to leak, a small leak can be very annoying if cruising and staying overnight requiring bailing or mopping. Many systems have been tried over the years, mostly unsuccessful. There have been rubber or neoprene washers to straight sealant over the bolt, these will work for a while but will eventually leak and have to be resealed. My system relies on totally encapsulating the pivot bolt and using two inspection ports (one each side of the centreboard case) for access. Two 12mm thick plywood discs are cut out, the diameter is the same as the outside diameter of the inspection port unit. Three 12mm thick plywood rings are also cut, same outside diameter and the inside diameter to allow fitting the inspection port. The inspection ports must be the ones that have an O ring under the lid. Two rings are glued to one disc and one ring glued to the other disc. The discs are drilled for a 12mm bolt and all covered with epoxy resin to seal the plywood. If desired the bolt hole can be drilled oversize and filled with high density epoxy bog and then redrilled. The disc with two rings is glued to the outside of the outboard side of the centreboard case and the disc with one ring glued to the outside of the inboard side of the case. The discs must align so pass a bolt through the whole assembly while the glue cures. The inspection port should be screwed to the outboard assembly before gluing to the case as there is not much room to wield a screwdriver between the case side and the hull side, use plenty of sealant under the inspection port. The inspection port is then screwed to the inboard assembly with sealant between. When the time comes to assemble the centreboard in the case the bolt is passed through from the inboard side to the outboard side and the nut tightened. The inspection port lids are then screwed in and gently tightened. This is all shown in detail on the drawings.
PaintHi,Well here we are on the last day of the 2009 Easter break. The rain has hardly stopped all weekend, disappointing for the sailors and campers, but what about the boatbuilders trying to paint their new boats? Fran has the new Scarab 18 ready to paint and all she has been able to do so far have been hatch inserts and the rudder and centreboard. Planning to apply the high build undercoat to the main hull this week (if the rain stops). We have had enough now, the dams and tanks are full to overflowing. The paint system we are using is Jotun Penguard primer followed by Jotun Imperite gloss. The Penguard is an epoxy based, 2 part high build primer. Jotun Imperite is an industrial high gloss paint that works great for trailerable boats. Jotun was used on the original Scarab 670 and still looked as good when I sold the boat as the day it was painted (about 4 years). It is a 2 part polyurethane finish that has really good gloss retention and a very durable surface. Originally we used the siphon feed type of spray gun that draws the paint up from the canister but now use a gravity feed gun (top loader). The top loader is much easier to use unless you want to spray overhead, not much of that on the outsideof a boat hull. Not sure if other builders have the same problem, but we find that after we are certain that the hull surface is ready to paint and have appliedthe first coat of high build, all sorts of imperfections become visible. We have tried many types of fillers to fix these imperfections after the high build has been applied and found the best to be epoxy resin mixed with Q Cells, j ust spread it on the area required and sand back before the next coat of high build. A good eye is needed at this stage to make sure there are no imperfections left as the gloss paint will really show them up. We typically apply 2 coats of high build primer, sanding between coats and 2 coats of gloss, wet on tacky (no sanding between coats). The colour chosen for the outside of this boat is Silver Grey, it is not a lifeless battleship grey but has a slight blue hue. Some bright graphics applied to the sides of the floats will enhance the look. The deck will be also Silver Grey with fine glass beads embedded in the surface and painted over. The last boat we built had a white deck and the colour almost sent me blind working on it outside. The inside will be undercoated and gloss finished with a 1 part paint. There are a few different ways to finish the inside, we have tried some of them, the first and most economical is to paint the inside with acrylic house paint. This works ok but most of the paints dont seem to cover very well unless a solid colour is used, next is undercoat and 1 part gloss enamel, (good coverage with white). Finally polyester flow coat(a waxed pigmented polyester resin), ok on poly boats but I am not sure if it would work on epoxy. Ours will be the gloss enamel (white) with some really nice aqua coloured cushions. We have found that the more boats that you paint, (especially trimarans), the luckier you get.
Scarab 18 weightHi,I have had a query from a concerned customer re the weight and displacement of the Scarab 18. He was concerned that the difference between the published weight and displacement was not enough to be practicable. I went ahead and checked my calcs and discovered that the dreaded spreadsheet gremlin had been at work. The weight was originally calculated using 450 gsm fibreglass both sides of the foam and should have been 400 gsm. This brings the weight down to 345 kg (759 pounds). At 500 kg (1100 pounds) displacement, the lower edge of the transom would be at the water surface. I have checked the main hull with a displacement of 550 kg (1210 pounds) to see what effect an extra 50 kg (110 pounds) would have, the lower edge of the transom would be immersed 23 mm (less than 1 inch). At 600 kg the transom will be immersed 32 mm. This is with the boat static and all the displacement being taken by the main hull, when the boat gets moving and is properly trimmed the transom will not be immersed. I am very grateful to this client for bringing this to my attention, it should have been picked up before I released the design and I will amend the drawings. Work is progressing very well on our personal boat, Fran is doing a great job and the boat will be ready for painting very soon. I am thinking about sails, spars, a trailer and an outboard motor. I had an old Johnson 4hp long shaft on the last boat and it worked well but this time will probably go for a new Honda. We have a few Honda small engines around the property and they are superb, always start first pull and never miss a beat. Fran has a Honda Accord car so she doesn't need any convincing.
Trimaran folding systemHere is some info on the folding system for the SCARAB 18 and SCARAB 650. The folding arms for both designs have been designed to be cut from aluminium plate. Each arm consists of 2 identical pieces bolted together using a fibreglass channel section. Sometimes I learn new methods from home builders who are building my designs who come up with ideas how to streamline the build. Olivier Blanc built a SCARAB 22 in Canada and came up with a great idea. He had the arms cut out and he joined them together with fibreglass channels. This worked so well I decided to use it on the next designs. This eliminates any welding which can be a problem with aluminium. The aluminium plate is cut by a computer controlled machine using a high pressure water jet, seems impossible but works like magic. The resulting cut is extremely accurate and very neat, clean and surprisingly economical. The computer files (for cutting) are supplied with the plans. If there is a problem with finding a workshop to do the cutting, Team Scarab can have the arms cut and shipped to your address.The fibreglass channels are laminated in a very simple mould built from 3 pieces of plywood. The mould is prepared for laminating by waxing and coating with PVA mould release. The channels are laminated and then cut to length and trimmed after releasing from the mould, they can be painted if desired. When bolting the arms together I use 2 pieces of the pivot material through the pivot holes before tightening up the bolts, this ensures that the pivots will be perpendicular to the arms.
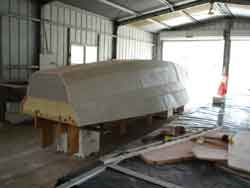
My philosophy and the Scarab 18Hi,this will be a feature from time to time when I feel I might have something to say. The first couple of posts will be specifically aimed at the new SCARAB 18 design. My philosophy is that I believe a pleasure boat should be as small and as simple as practicable for the purpose intended. If you only ever sail the boat occasionally you don't need a complicated, expensive vessel that requires the family home to be sold to finance it. I also believe that owners should aim for the minimum number of crew to rig and sail the boat. Some boats require 2 to 3 crew to sail them but 4 or 5 to raise the mast. One of the most difficult aspects of racing is to have a regular crew available, so, the less crew required the easier it will be to organise the weekend race. If the boat is going to be home built it should be as easy and economical to build as possible, projects that take 5 years or more to complete can have a bad effect on relationships. Now, the SCARAB 18. I feel that this is my best design; it fits perfectly within the parameters outlined in the philosophy above. The boat goes together quickly and without any dramas. Fran, my partner has almost completed the second S18 and will have it ready to paint in just less than 500 hours. She has built it in Klegecell foam and polyester resin. The design was first sketched back in 2001 and looked promising, from the original sketches I then designed the SCARAB 350, SCARAB 16 and the SCARAB 650. The original idea was not to provide plans for the 18 but to sell completed boats, this idea was shelved after we had so many inquiries about the availability of plans to build. Now with the current world economies going downhill it makes sense to think of a more compact unit.
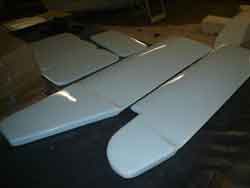
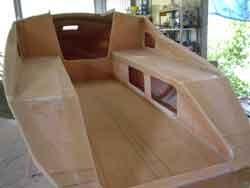
Scarab 18The latest designs, S350, S16, S18 and the S650 all share a similar hull shape. Both the main hull and floats have a flat bottom panel. The main hull then has 4 panels per side up to the sheer line and the floats, 2 panels per side up to the sheer. Having the flat bottom panel makes construction so much easier than having a vee bottom. Once the hull is lifted off the building frame it can sit quite comfortably on the floor of the building area (on some protective padding, old blankets, carpet or similar). The hull will need to be levelled fore and aft and athwartship for setting up the bulkheads, main beams and interior components: eg. settee risers and bunk shelf. A spreader may sometimes be required across the hull to keep the sides from bowing out, just use a strip of 12mm ply about 150mm wide and fastened at the sheer line. This arrangement is very convenient for most builders as they can reach further over the sheer when setting up the bulkheads and main beams.The floats can be lifted off the frame and set up on a table and levelled up. Fran always builds two floats together as she finds the work flows really well doing them side by side. Both floats are then finished within a few hours of each other, looks very impressive. At the moment I am chasing around and on the lookout for a mast, boom and trailer for our personal SCARAB 18. A Hobie 18 mast and boom will work very well and in the past I have had a Hobie 18 trailer modified to carry the original Scarab 670, may do the same for this boat. The trouble is off loading the spare Hobie hulls. The gear, main sheet, jib sheets and some of the rigging can be used on the SCARAB 18, even the H18 sails can be used if economising. I will be happy to rig our boat with a used mast and boom, main sheet etc but will have new sails made. This brings up the question as to whether catamaran hulls can be used as floats for my trimaran designs. Unfortunately the answer is no. The reasons being
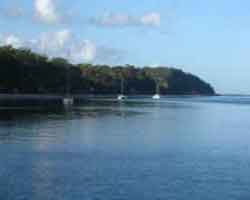
Never smile at a crocodile.Fran believes our S18 will be finished soon and I am already thinking about getting away over to Fraser Island.In the local news recently there were reports of a large salt water croc seen at Garry's Anchorage (a popular spot on the island). About 10 years ago we saw what we believed to be a small crocodile (about a metre long) running very fast along a sand flat in Tin Can Bay. We were sailing probably 75 metres out from the sand flat and he was going like the clappers, with spray flying everywhere, not sure what he was after but he was determined to get it. They may be related. Whenever we sail the Great Sandy Straits (between Fraser Island and the mainland) we see lots of wildlife, turtles, dugong, dolphins and red sea eagles. |